Audience Message: Site administrator
Introduction
The Audience Message block plugin allows you to set personalised messages to different audiences, displaying in a block format to the users, which is specially designed to appear on the main dashboard. Different users will view different messages, which are configured as “rules”.
Exactly which messages users will see, will depend on the match-ups between their personal user profile details and the filtering options set up for each message rule. Hence, Science students will be able to view the messages configured for the Science department, Year 1 students will be able to view any messages configured for whichever custom profile field deals with Year 1/2/3/4 denotations, if any, and so on.
If no active rules match for the logged-in user, then there are no messages to display, hence the block will not appear on the dashboard to that user at that time.
Core Moodle has limited user-specific student displays on their main dashboard. Therefore, this plugin meets the requirement to have prominent, urgent, timed, or important messages to different segments of students, and / or staff.
Administration
This section is for the administration of the Audience Message plugin.
Version Support
This plugin is supported for Moodle versions 4.1, 4.4, and 4.5.
Deployment
To install the Audience Message block (block_audiencemessage):
- Unzip and copy the audiencemessage folder into Moodle’s blocks/ folder.
- Go to Site administration > Notifications to install the block.
Further installation instructions can be found on the Installing plugins Moodle documentation page.
Configurations
The configurations for this Audience Message block are:
- Hide Header – Allows the block header to be hidden for users.
- Profile field X – Six profile field settings in total, to allow specific message configuration for users. Not all six profile field settings need to be configured.
Please note: the purpose of the user profile field configurations being set here, are so they are available as filter options for the rules being created later. Any created custom user profile fields are also included here. A range of profile fields can be set, from only one up to the maximum of six.
The rules will then be compared to the viewing user’s own profile values, such as Department, matching the rule value, or Institution, and so on. If fully matched, the message for each rule will then appear to the user.
Any rule can also use a wildcard of “*” on some profile fields, to just filter on one particular field, as needed.
Capabilities
| Capability name | Manager | Teacher | Auth User |
|---|---|---|---|
| block/audiencemessage:addinstance: Add an Audience Message block | Allow | Allow | |
| block/audiencemessage:myaddinstance: Add a Audience Message block to dashboard | Allow | ||
| block/audiencemessage:config: Manager Audience Message block rules | Allow | Allow |
Addinstance capability
The capability “block/audiencemessage:addinstance” allows users with the relevant permissions for that context to add the Audience Message block.
This capability is granted by default to these following archetype roles, using course context:
- Manager
- Teacher
Myaddinstance capability
The capability “block/audiencemessage:myaddinstance” allows users with the relevant permissions for that context to add the Audience Message block.
This capability is granted by default to these following archetype roles, using course context:
- Auth user
Config capability
The capability “block/audiencemessage:config” allows users with the relevant permissions for that context to manage the Audience Message rules.
This capability is granted by default to these following archetype roles, using course context:
- Manager
- Teacher
Copyright and funding
This plugin has been developed, maintained, and is copyrighted by Brickfield Education Labs, while initial funding for this plugin was provided by the National Institute for Digital Learning at Dublin City University.
Usage as Site administrator
The ONLY way to manage global audience rules for everyone is via a single global Audience Message block on the Default dashboard page.
Please note: it is very important to follow these initial guidelines, in setting up your global audience message block, as the alternative would potentially be several personal dashboard blocks with no ability to create or display global messages. As Moodle has a great deal of flexibility around dashboard blocks in general, and we have to work within these coding permutations, it is important to recognise this.
Adding the Audience Message block
- Go to Site Administration.
- Click the Appearance tab.
- Click the Default Dashboard page link.
- Enable Edit mode.
- Click Add a block in the block drawer.
- Click Audience Message.
- Click “Reset Dashboard for all users” to ensure all users can view the Audience Message block on their personal dashboards.
Manage rules
To access the “Manage rules” page:
- Go to Site Administration.
- Click the Appearance tab.
- Click the Default Dashboard page link.
- Locate the Audience Message block in the block drawer.
- Click the Manage Rules link to go onto the next page.
- Please note: if you do not see a “Manage Rules” link, you have not set up the single global Audience Message block as a default Dashboard block correctly. You will need to delete the existing block and repeat this process.
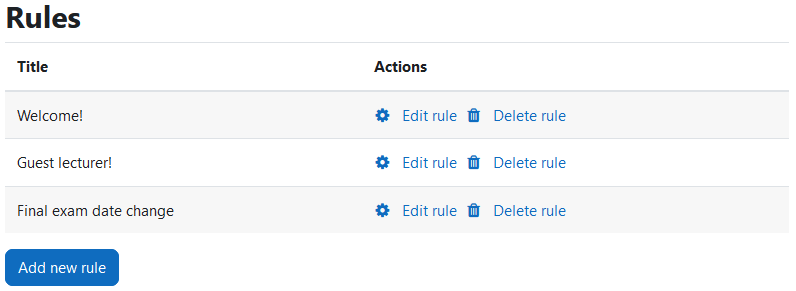
The “Manage rules” page displays all of the currently set up rules:
- Rules – The rules table, with the main results content.
- Add new rule – The button to add a new rule, under the table.
This Rules listings page table displays the following for each rule:
- Title – The rule’s title.
- Actions – The actions for the rule.
- Edit rule.
- Delete rule.
Adding a new message rule to be displayed
For each message rule being added or edited, its core purpose is to have:
- Title – for management identification only.
- Status (active or inactive).
- Profile field filters – which user profile values need to match, in order for this message to appear to the logged-in user.
- Optional message duration (start and end date).
- Message text.
Furthermore, the matching of the profile fields has three modes available, as follows:
- A wildcard value of “*” will match any user’s value.
- A string value will match if it’s contained within the user’s value.
- Please note this is slightly flexible, so ensure your rule’s value isn’t too vague, such as “Year”, which would match potentially every student.
- A regex string, which will be processed as such as long as it starts and ends with the character “/”, will match any user’s value matching that regular expression as processed with preg_match() in PHP. So as an example, this can be used to filter for special email address domains for lecturers, and so on.
To add a new message rule, to be displayed:
- Click the Add new rule button link to go onto the next page.
- Configure the new rule accordingly.
- Click the Save changes button.
Editing or deleting an existing message rule
- Click the Edit link for the rule link to go onto the next page.
- Configure the rule accordingly.
- Click the Save changes button
- Click the Delete link for the rule
- Click the Continue button to confirm the deletion.