HSA Query: Site administrator
Introduction
This HSA Query plugin enables an institution to collect and maintain enquiries from the public about signing up for participation in an online course.
It provides an easy to access form for registering to the online programme, which crucially does not require a login.
Additionally, for administrators, there is a dedicated, easy to use, interface to manage both new and archived enquiries as entries.
The administrator can process, edit, and archive each entry independently of another. The archived entries are managed separately and can be unarchived when necessary.
Administration
This section is for the administration of the HSA Query local plugin.
Version Support
This plugin is supported for Moodle versions 4.1, 4.4, and 4.5.
Deployment
To install the HSA Query local plugin (local_hsa):
- Unzip and copy the hsa folder into Moodle’s local/ folder.
- Go to Site administration > Notifications to install the local plugin.
Further installation instructions can be found on the Installing plugins Moodle documentation page.
Configurations
- Email for notifications – User email to receive notifications of new enquiries.
- Enrol to course – Enrol registered users as a non-editing teacher to this course.
- Award this badge – Award this master badge to registered users.
Copyright and funding
This plugin has been developed, maintained, and is copyrighted by Brickfield Education Labs. The funding for this plugin was provided by the Health & Safety Authority in Ireland, or HSA.
Usage as Site administrator
This involves managing the new and archived enquiries, or entries, to the HSA online programme. New entries can be added manually in the administration interface, if necessary. Each entry can be processed, edited, and archived independently of each other.
Once an entry is archived, it will no longer appear in the new entries table but instead the archived entries table. All archived entries can be set to new again if necessary.
Adding an entry
To add an entry:
- Go to Site administration.
- Click the General tab, if not on it already.
- Scroll down to the HSA section.
- Click the HSA registrations entries link.
- Click the Add new entry button.
- Add the relevant details to the registration form.
- Click the Save changes button.
New entries
To access the “New entries” page:
- Go to Site administration.
- Click the General tab, if not on it already.
- Scroll down to the HSA section.
- Click the HSA registrations entries link.
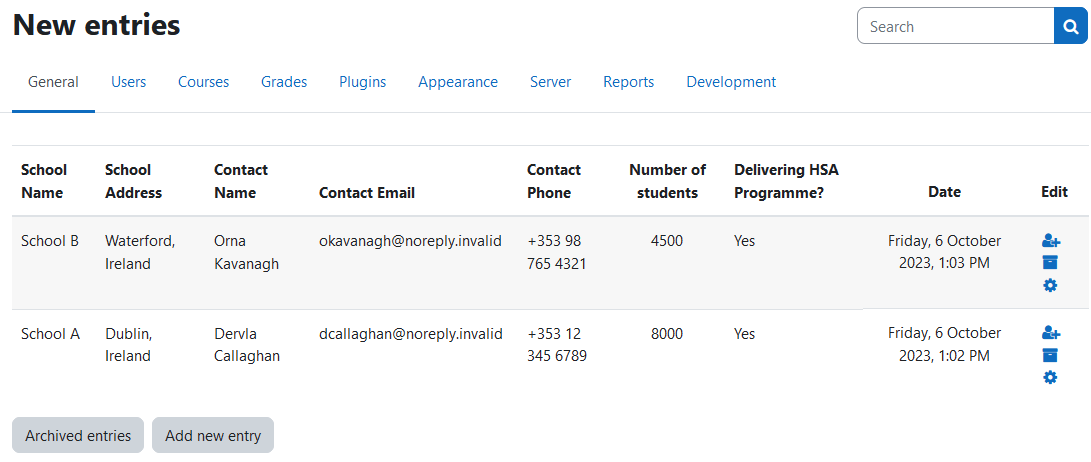
The “New entries” page displays:
- New entries – The New entries table, with the main results content.
- Archived entries – The button to access the archived entries page.
- Add new entry – The button to access the registration page.
The New entries table displays the following for each entry:
- School Name – The school name.
- School Address – The school’s street address.
- Contact Name – The contacts name.
- Contact Email – The email for the school’s contact.
- Contact Phone – The number of the school’s contact.
- Number of Students – The number of students doing the programme.
- Delivering HSA Programme? – Yes or No for if the programme is being delivered.
- Date – The date the entry was created.
- Edit – The actions for the entry.
- Process entry,
- Archive entry,
- Edit entry.

Processing an entry
To process an entry:
- Locate the entry in the New entries table.
- Click the Process entry icon in the entry’s row.
Editing an entry
To edit an entry:
- Locate the entry in the New entries table.
- Click the Edit entry icon in the entry’s row.
- Edit the relevant entry details.
- Click on Save changes.
Archiving an entry
To archive an entry:
- Locate the entry in the New entries table.
- Click the Archive entry icon in the entry’s row.
Archived entries
To access the “Archived entries” page:
- Click the Archived entries button on the New entries page.
The “Archived entries” page displays:
- Archived entries – The Archived entries table, with the main results content.
- New entries – The button to access the new entries page.
- Add new entry – The button to access the registration page.
The Archived entries table displays the following for each entry:
- School Name – The school name.
- School Address – The school’s street address.
- Contact Name – The contacts name.
- Contact Email – The email for the school’s contact.
- Contact Phone – The number of the school’s contact.
- Number of Students – The number of students doing the programme.
- Delivering HSA Programme? – Yes or No for if the programme is being delivered.
- Date – The date the entry was created.
- Edit – The “Set entry to new” button.
Setting an archived entry to new
To set an archived entry back to new:
- Locate the entry in the Archived entries table.
- Click the Set entry to New icon in the entries row.
