Planner: Teacher
Introduction
These instructions by DCU Teaching Enhancement Unit are licensed under Creative Commons Attribution 4.0 International.
Add an Assignment or Quiz
- On your Moodle course page, with edit mode toggled on, choose Add an activity or resource in a particular section.
- Choose either Assignment or Quiz from the Activity Chooser.
- Configure the settings as needed, but remember that in order for Planner to calculate dates, a start date and end date are needed.
- In Assignment settings, set the Allow submissions from date and the Due date.
- In Quiz settings, set the Open date and the Close date.
- Choose Save and return to course.
Add a planner
- On your Moodle course page, with edit mode toggled on, choose Add an activity or resource in a particular section
- Choose Planner from the Activity Chooser
- Under General, enter a name for the Planner and a description
- Next to Information on course page, choose the level of information from the Planner you wish to display to students when they see Planner on the course page
- Use the Select activity dropdown menu to select an Assignment or Quiz to associate the Planner with – one Planner can only be linked to one activity, and vice versa
- Use the Template dropdown menu to select a template to use for this Planner, from any available global templates or your own personal templates – allow a moment for the page to refresh
- If you wish to amend the instance of the template you have selected, follow these next instructions; if you wish to use the template as is, skip to instruction 8
- Alter any of the steps if required, by editing the text in the Step X name, Step X time allocation and Step X description fields
- Note the time allocation is the percentage of time you wish students to spend on that particular step – a number is all that should be entered, no percentage symbol is required, and all steps’ time allocation should add up to 100
- If you need to remove a step, delete the text in the step’s name, time allocation and description fields
- If you need to add a step, choose the button Add 1 step to the form and wait for the page to reload with a new blank step added, into which you can input a name, time allocation and description
- In the Disclaimer field, enter a disclaimer for students, e.g. “These steps are guidance only”
- If you have edited the steps in the Planner and wish to save them for future use, chose the Save as new template button, and in the modal window which appears, enter a name for the template and choose Save as new template
- Alter any of the steps if required, by editing the text in the Step X name, Step X time allocation and Step X description fields
- Under the remaining settings, such as Common module settings and Restrict access, configure if required
- When finished, choose Save and display
- When the Planner loads, choose the button Calculate student steps – this is important, do not forget to do this or Planner will not work for students!
Create a template
As well as creating new templates for yourself by editing an existing one within a Planner and saving it, you can create templates from scratch within a course. These templates are associated with your user account so you can use them in any Planner on any course in which you are enrolled as editing teacher. You can also create the template as a global template, allowing all teachers on your Moodle system to use it too.
- From your Moodle course top menu, choose More and then Manage Planner templates
- To add a new template of your own, choose Add new template
- Add a name for the template in the Template name field
- From the Template type dropdown menu, choose to make it either a Global or Personal template – global means all other teachers will be able to use it, personal means only you will be able to use it
- Other teachers cannot edit or delete a global template of yours, they can only use it, however a site administrator can edit or delete any global template you create
- A number of default steps, names and time allocations are provided – edit each of the fields with the steps you wish to create
- Note the time allocation is the percentage of time you wish students to spend on that particular step – a number is all that should be entered, no percentage symbol is required, and all steps’ time allocation should add up to 100
- If you need to remove a step, delete the text in the step’s name, time allocation and description fields
- If you need to add a step, choose the button Add 1 step to the form and wait for the page to reload with a new blank step added, into which you can input a name, time allocation and description
- In the Disclaimer field, enter a disclaimer for students, e.g. “These steps are guidance only”
- Choose Submit when finished
- A success message appears saying “Template added successfully” and it appears listed under My Planner Templates
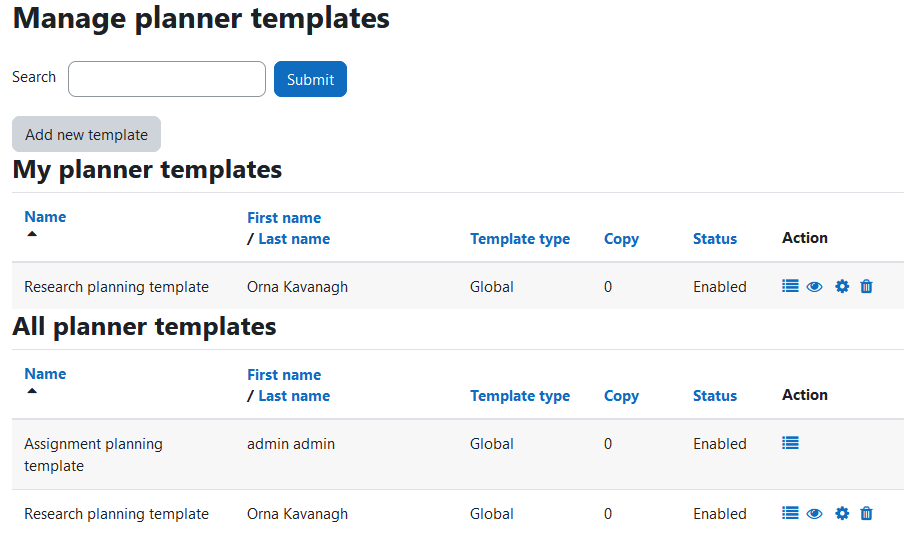
Manage your personal templates
- From your Moodle course top menu, choose More and then Manage Planner templates
- Under My Planner templates you will see the templates you have created – look to the Action column to identify four icons:
- The List icon will display the template’s steps in a modal window for you to browse
- The Eye icon will allow you to disable or enable the template
- The Cog icon will allow you to edit the steps, names, time allocation, description and disclaimer for the template
- The Trash can icon will allow you to delete the template
Performing any of these actions affects the template itself but not any instances of the template which are in use in Planners
Browsing global templates
- From your Moodle course top menu, choose More and then Manage Planner templates
- Under All Planner templates, browse the list of global templates available on your Moodle site, as well as your own personal templates
- To inspect a template in more detail, choose the List icon from the Action column
- If you wish to use a global template in a Planner, follow the steps to add an Assignment/Quiz and a Planner to your course and in setting up the Planner choose that particular global template
Exploring the student report
As students engage with Planner they have the option to self-check their steps as complete. Teachers can then access a report of students who have self-checked as follows:
- From the Moodle course page, select your Planner to open it
- From the top menu, choose Report
- A table appears of all students and all steps in the Planner, with either Pending or Complete listed for each student under each step, depending on whether they have self-checked or not
- At the bottom of the screen, select the Download CSV button to export the report as a spreadsheet for offline exploration or analysis