Compass Plus: Manager
Introduction
This involves managing the CRUD for the frameworks, which contain the competency details for teachers’ and students’ interactions.
A framework’s components are:
- Framework – sets the “Framework name”, “Introduction”, “Conclusion”, “Framework type” and “Status”: contains one or more domains.
- Domain – sets the “Domain” name: contains one or more skills.
- Skill – sets the “Skill name”: contains one or more competencies. Furthermore, if the framework type is set to Boundary, each skill contains one or more feedback boundaries (once configured).
- Boundary – sets a number of ranged feedback scores, with “upper limit” and “feedback” values: available only for the “Boundary” framework type.
- Competency – sets the “statement” and “question”: contains one or more levels.
- Level – sets the “Level name”, “Score” and “Feedback”.
Compass Plus frameworks
To access this Compass Plus frameworks page.
- Go to Site administration.
- Click the Plugins tab.
- Click Admin tools > Compass Plus > View Compass plus frameworks.
This Compass Plus frameworks page displays:
- Create a new framework – The link to access the framework form to create a new framework.
- Frameworks – The frameworks table.
This frameworks table displays the following for each framework:
- Framework name – The framework name.
- Actions – The options:
- Edit
- View framework domains
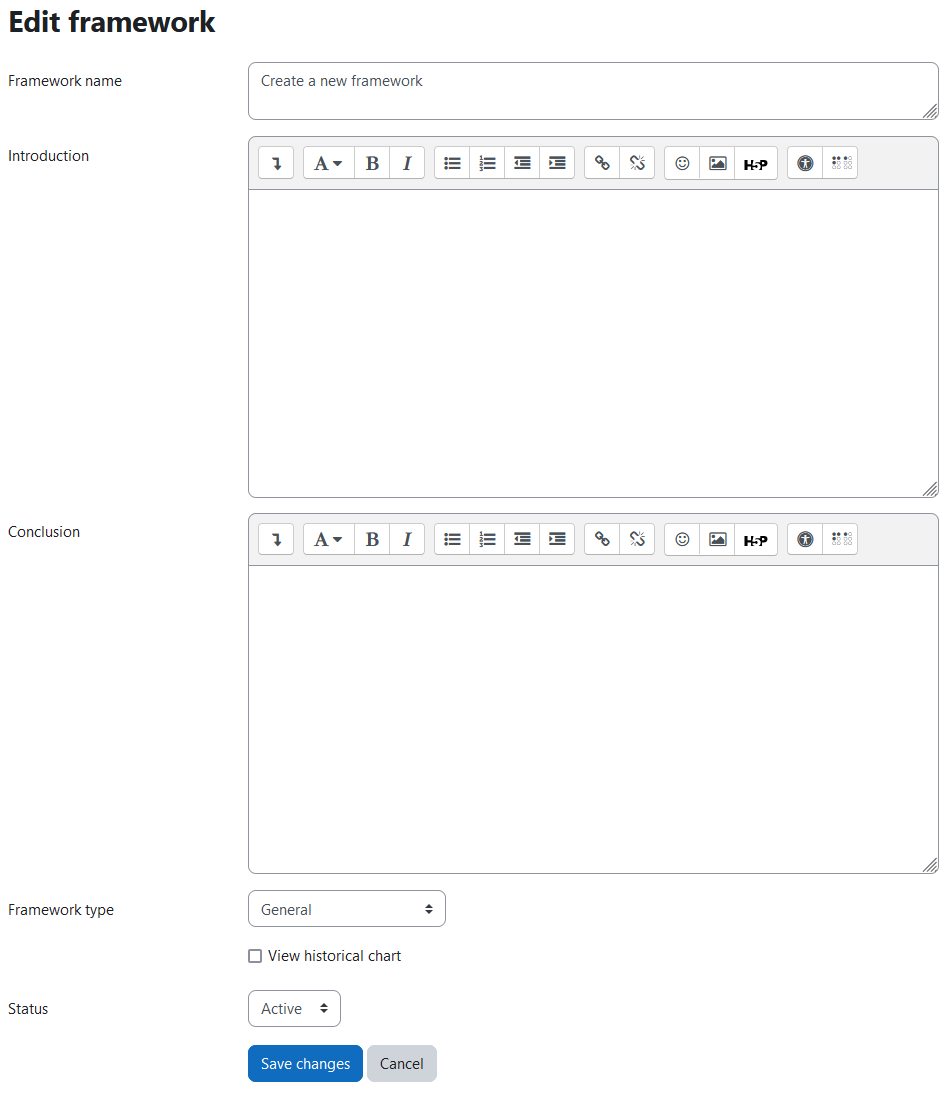
Creating a new framework
To create a new framework:
- Click the Create a new framework link.
- Add the frameworks details:
- Framework name – the framework’s name.
- Introduction – introduction to the framework.
- Conclusion – conclusion of the framework.
- Framework type – impacts how the students view their end results and feedback:
- General
- Boundary
- Ranking
- Assignment Submission
- View historical chart – either active or inactive.
- Status – either active or inactive.
- Select the Save changes button.
Viewing framework details
To view a framework’s details:
- Click the View framework domains icon in the frameworks table to view the domains.
- Now, click the View skills icon in the domains table to view the skills.
- Now, click the View competencies icon in the skills table to view the competencies
- Additionally, if the framework type is boundary, then the skills boundaries can be managed by clicking the View Boundaries icon in the Skills table.
- Now, click the View levels icon in the Competencies table to view the levels.
Please note that while viewing any part of the framework hierarchy, there is an Edit icon to alter its specific content.
Import competencies
To access the “Import competencies” page:
- Go to Site administration.
- Click the Plugins tab.
- Click Admin tools > Compass Plus > Upload CSV of competencies.
The “Import competencies” page displays:
- A help tip with guidance on CSV file formatting.
- Select your framework – A dropdown menu containing frameworks to upload competencies too.
- Please note: only frameworks which are active AND empty are displayed here.
- Download a sample competencies CSV file – A link to download a CSV file with example content.
- Upload your CSV file here – The file area for the CSV.
- CSV options:
- CSV separator
- The semicolon (;) separator can often be used here, if the CSV values contain commas within their sentences or text.
- Encoding
- CSV separator
- Upload – The button to upload the CSV file.
Uploading a CSV file of competencies
To upload a CSV file of competencies:
- Select a framework to upload the competencies too.
- Upload the CSV file.
- Select the applicable CSV delimiter and Encoding options as required.
- Select the Upload button.
Import responses
This Import responses page is intended as a testing page, and not as much for production interaction.
To access this Import student responses page:
- Go to Site administration.
- Click the Plugins tab.
- Click Admin tools > Compass Plus > Upload CSV of responses.
This Import student responses page displays:
- A help tip with guidance on CSV file formatting.
- Select your framework – A dropdown menu containing frameworks to upload responses too.
- Download a sample responses CSV file – A link to download a CSV file with example content.
- Upload your CSV file here – The file area for the CSV.
- CSV options:
- CSV separator
- Encoding
- Upload – The button to upload the CSV file.
Uploading a CSV of responses
To import a CSV of responses:
- Select a framework to upload the responses too.
- Upload the CSV file.
- Select the applicable CSV delimiter and Encoding options as required.
- Select the Upload button.

Compass Plus reports
To view the Compass Plus reports:
- Go to Site administration.
- Click the Plugins tab.
- Click Admin tools > Compass Plus > View Compass Plus reports.
- The Frameworks tab displays the framework submissions.
- The Users tab displays the users’ individual submissions.
View Framework responses
To access the Framework responses:
- Select the Frameworks tab to view the framework submissions.
The Framework responses table displays the following for each framework:
- Framework – the framework name.
- Submissions completed – the number of completed framework submissions.
- Submissions started – the number of pending framework submissions.
- Unique users – the number of unique users that have generated framework submissions.
View User responses
To access the users’ individual submission responses:
- Select the Users tab to view the student responses.
- To view a user’s individual framework responses, click the relevant View responses icon in the View column.
The Student responses table displays the following for each student / user:
- User – the user’s name.
- Latest submission – the time and date of the latest submission.
- Responses count – the number of responses the student submitted.
- View – the link to view the student’s submission.